File Browser

Sunday, 27 December 2020
Using the File Browser to manage files and folders
The File Browser Interface
Insert a file
Upload a file
Delete a File or Folder
Rename a FCreate a New Folderile or Folder

The File Browser interface is composed of 4 sections

file browser interface header
The Header, which contains the Path list on the left, and actions - New Folder, Upload and Help - on the right
Folder Tree

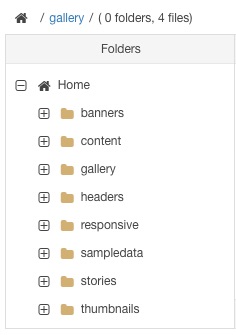
The Folder Tree which shows a list of all the folders in each directory.

Click on a folder name to open it, or on the plus icon to expand the tree and show the folders it contains.

File List

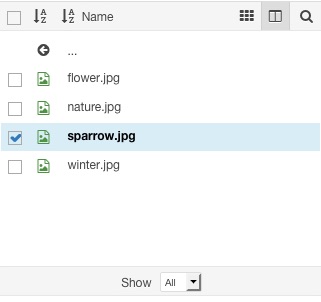
The File List shows all the files and folders in the current directory. Click on a file name to select it for inserting or editing. Click on a checkbox to select a file for editing. Multiple files can be selected and de-selected by clicking on each files checkbox. Use CTRL + Click and SHIFT + Click to select multiple files.

A toolbar above the File List includes various options for managing the list

  • Select and de-select all items in the list by clciking the checkbox in the toolbar
  • Click the button to sort the files by extension
  • Click the Name button to sort the list by name.
  • Click the button to toggle the grid view
    Grid viewGrid view
  • Click the button to toggle the Folder Tree panel.
  • Click the button to show the Filter input field. Type into the field to filter the list.
Details
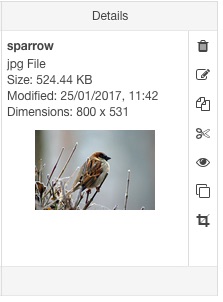
The Details panel shows information about the selected file or folder - including a preview in the file is an image - as well as a list of actions that can be performed on the item.
  • Delete a file or folder
  • Rename a file or folder
  • Copy a file or folder to the clipboard
  • Cut a file or folder to the clipboard
  • Paste an item that has been cut or copied (this button is only visible when items have been cut or copied)
  • Show a preview of a file
  • Edit an image (JCE Pro only)
 

The Insert button is available in the File Browser dialog when the dialog is launched from an input field, such as from the Link dialog or Table dialog.

To insert a file:

Select a file to insert by clicking on its name in the file list.

Click the Insert button.

The dialog will close and the file url will be inserted into the assoicated input field.

Insert a file


To upload a file

  1. Click the Upload button to open the Upload Dialog
    Upload dialog
  2. Click the Browse button and locate the target files on your computer. Multiple files can be selected and added. 
    Upload select files
    Files can also be dragged and dropped into the upload dialog.
    Upload drag & drop
  3. The files will be added to the upload queue. The name of each file can be edited and a file can be removed from the queue by clicking the trash icon  
    Upload rename and delete
  4. Click the Upload button to begin the upload. The progress of each upload will be disaplayed as a percentage and by the progress bar beneath each file. When all the files have been successfully uploaded, the dialog will close. If an upload fails, an error message will be displayed below the file name.
    Upload files

Deleting Files and Folders

Multiple files or single folders can be selected and deleted.

A folder must be empty before it can be deleted. If it isn't, you must delete all files and folders in it before attempting to delete it otherwise an error message will be generated.

To delete files and folders:

  1. Select the folders and/or files to delete by checking the items checkbox
  2. Click the 'Delete' button 
  3. An alert dialog will be displayed requesting confirmation of the action. This is to prevent accidental deletion of an item. Click the Delete button to confirm or No to cancel.
    Confirm Delete
  4. The request is sent to the server and the dialog is closed.

If the file or folder cannot be deleted, one of the following error messages will be shown:

  • Invalid Directory - The folder does not exist. It may have been deleted by another user just before your attempt.
  • Unable to Delete Folder! - The folder's permissions may prevent it from being deleted or the server was unable to complete the request.
  • Please delete all files/folders inside the folder you wish to delete first. - The folder is not empty. Only empty folders can be deleted.
  • File Not Found! - The file does not exist. It may have been deleted by another user just before your attempt.
  • Unable to Delete File(s)! - The file(s) permissions may prevent it from being deleted or the server was unable to complete the request.

Renaming a File or Folder

To rename a file or folder:

  1. Select the file or folder to rename by checking the items checkbox. Only one item can be renamed at a time.
  2. Click the Rename icon 
  3. The Rename dialog will open showing the existing item name. 
    Rename dialog
  4. Type in a new name for the item.
    The name can contain any character that is allowed in a URL, including the letters A-Z, the numbers 0-9, spaces, and any UTF-8 character, but excluding the characters +\/?#%&<>"'=[]{},;@^()£€$
  5. The request is sent to the server and the dialog is closed.
  6. If the file or folder cannot be renamed, one of the following error messages is displayed:
  • A file of the same name already exists! - The new file or folder cannot have a name of a file or folder that already exists on the server. The new name must be unique.
  • Unable to rename file! or Unable to rename folder! - This is a general error displayed when the the server is unable to rename the file or folder. Most commonly generated due to a permissions problem with the target item, ie: not writable.
  • Invalid folder name, please choose another folder name. - The new name is the same as a reserved folder name.

To create a new folder:

  1. Click the New Folder button 
  2. The New Folder dialog will open.
    New folder dialog
  3. Enter the name of the new folder in the field provided.
    The name can contain any character that is allowed in a URL, including the letters A-Z, the numbers 0-9, spaces, and any UTF-8 character, but excluding the characters +\/?#%&<>"'=[]{},;@^()£€$
  4. Click the OK button. The request is sent to the server and the dialog is closed.

If the new folder cannot be created, an error message is displayed.

5252 times

Sunday, 27 December 2020